
How to Improve Squarebody Visibility at Night
A Squarebody can look perfect sitting under shop lights and still be a white-knuckle drive after dark. Weak sealed beams, tired grounds, hazy lenses, and mirrors that show more of your bedside than the next lane all add up fast. If you are figuring out how to improve squarebody visibility, start by treating it as a system instead of bolting on the brightest light you can find.
These trucks were built in a different era. Their factory lighting was adequate when everything was new, but many rigs now have decades of corrosion, patched wiring, worn switches, and previous-owner repairs in the mix. The good news is that most visibility problems can be fixed without turning a clean 1973-1991 Chevy or GMC into something that no longer looks like a Squarebody.
How to Improve Squarebody Visibility Starts With the Basics
Before buying lights, inspect what the truck already has. A new lamp will not do much if it is fed through a weak connection or aimed at the treetops.
Start at the headlights. Check for cloudy or cracked lenses, water inside the housings, loose terminals, melted plugs, and brittle insulation near the front core support. On trucks still running sealed beams, make sure the beams themselves are not darkened or discolored. A sealed beam can still light up and be well past its useful life.
Then look at the grounds. Squarebodies are old enough that a ground wire may appear connected while barely making contact through paint, rust, or corrosion. Clean the connection to bare metal where appropriate, tighten it properly, and protect it from moisture afterward. Do the same with the battery connections and the main engine-to-body ground. Bad grounds cause more strange lighting behavior than most people expect - dim lamps, blinking indicators, and lights that change brightness when another accessory comes on.
Voltage drop matters too. With the engine running, compare voltage at the battery and at the headlight connector. A noticeable drop at the connector points to resistance in the wiring, connectors, switch, or dimmer circuit. On a truck with a tired factory harness, a relay harness can be a worthwhile upgrade. It lets the original headlight switch trigger relays while the headlights receive power through properly fused, heavier-gauge wiring.
That is not glamorous work, but it is the work that makes the rest of the upgrade count.
Aim Your Headlights Before You Judge Them
Aiming is one of the cheapest improvements you can make, and it gets skipped all the time. A headlight aimed too low gives you a short tunnel of light. One aimed too high may look bright from the driver seat while throwing glare into oncoming traffic and lighting everything except the road.
Park on level ground facing a flat wall or garage door. Make sure tire pressure is right, the truck has a normal fuel load, and anything you regularly carry is in the truck. A lifted K10 on tall tires, a lowered C10, and a stock-height Suburban do not sit the same, so do not copy another truck's adjustment blindly.
Measure the height of each headlight center from the ground and mark that height on the wall. Back the truck away on level ground, then adjust according to the specifications for your specific headlight setup and applicable local requirements. The goal is a controlled beam pattern that puts usable light down the road without blasting other drivers.
If one beam pattern looks fuzzy while the other looks clean, do not assume adjustment is the problem. It may be a poor-quality lamp, a damaged housing, or a light that is not seated correctly in its bucket.
Choose Light Output You Can Actually Use
For many Squarebody owners, a quality replacement sealed beam or a well-built direct-fit headlight conversion is enough. Better optics and a clean beam pattern matter more than a flashy number on the box. A light with sharp cutoff and even coverage helps you see lane edges, road debris, and animals without creating a wall of glare in rain or dust.
LED conversions can work well, but fitment and beam control are the whole game. Some LED bulbs do not place the light source where the original filament sat, which can scatter light in a reflector designed for a sealed beam or halogen bulb. The result is often plenty of glare and not much useful distance. If you go LED, choose a setup made to produce a proper pattern in the housing you are using, verify room behind the headlight bucket, and make sure wiring and connectors can handle the setup.
Also pay attention to color temperature. Very blue-white light can look impressive in a parking lot but can be harder on the eyes in rain, fog, dust, or snow. A more natural white usually gives better contrast on real roads.
Add Auxiliary Lighting With a Job in Mind
Auxiliary lights are useful on a Squarebody that sees back roads, trails, ranch property, or dark work areas. They are not a replacement for correctly aimed headlights.
Driving lights should supplement forward distance. Fog lights should be mounted low and aimed low to help in poor weather. Wide ditch lights can help spot the shoulder or trail edge. A rear work light can make loading gear, hooking up a trailer, or backing into a campsite a whole lot easier.
Each light needs a purpose. Stacking random pods across the bumper may produce a lot of brightness, but it can also create hood glare, windshield reflection, excess electrical load, and unwanted attention from everybody coming the other direction. Keep road-use lighting legal for your area, wire every auxiliary circuit with the right fuse and relay, and use a switch placement you can reach without taking your eyes off the road.
Mounting matters on old trucks, too. A light bar or pod mounted where it shakes constantly will not stay aimed. Use solid brackets, protect wiring where it passes through metal, and leave enough slack for normal body and suspension movement.
Do Not Forget Marker, Brake, and Reverse Lights
Visibility is not only about what you can see. It is also about being seen.
Walk around the truck with the lights on. Check front markers, side markers, tail lamps, brake lamps, turn signals, license plate lamps, and reverse lamps. On a Fleetside pickup, pay close attention to tail lamp grounds and sockets. On Blazers, Jimmys, and Suburbans, inspect the rear harness routing and the condition of the lenses. A faded lens or corroded socket can make a working bulb look weak.
Make sure the turn signals are easy to distinguish from the brake lights. If a signal flashes oddly, starts speeding up, or makes another lamp blink with it, stop and fix the wiring issue instead of living with it. These trucks are simple enough that methodical testing usually finds the problem.
Reverse lighting deserves more thought than it gets. A clean set of factory-style reverse lamps may be enough for a street truck. A rig with a camper shell, spare tire carrier, dark tint, or trail use may benefit from a properly switched rear-facing work light. Just aim it so it helps you see the ground behind the truck, not the back window of the vehicle behind you.
Mirrors and Glass Make a Bigger Difference Than Most Upgrades
Squarebody cabs have flat glass and good sightlines by modern-truck standards, but the mirrors need to be set up for the way you use the truck. Adjust the driver mirror so you can barely see the side of the truck, then use the rest of the mirror for the lane beside you. Do the same on the passenger side if equipped. Seeing less bedside and more traffic reduces the blind area where a car can disappear.
If you tow, wider mirrors may be worth it, but choose a setup that is stable and does not shake at highway speed. A mirror that vibrates is not much better than no mirror at all. Keep mirror glass clean, replace cracked glass, and tighten loose mounts before chasing more expensive upgrades.
Clean the windshield inside and out. Old glass often develops fine pitting that catches headlights from oncoming traffic, and oily film on the inside makes that glare worse. Wiper blades, washer nozzles, and the defroster also belong in the visibility conversation. You may have great headlights, but they cannot help much through a fogged or smeared windshield.
Keep the Cab From Working Against You
Interior lighting can help or hurt. Bright white map lights, glowing switches, and a shiny dash can reflect in the windshield and ruin your night vision. Keep interior accent lighting low enough to find controls without turning the cab into a light box.
This matters when adding audio and interior upgrades. A clean install should keep wiring secured, controls easy to reach, and lighting useful instead of distracting. On a Squarebody, the details matter because there is not much excess room in the cab to hide a bad plan.
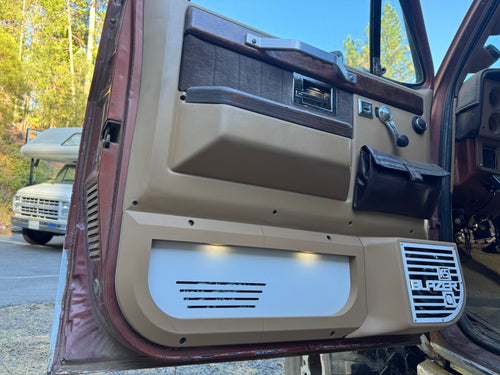
If your factory door panels are worth saving, avoid cutting them up just to add sound. A direct-fit lower door speaker panel can add usable audio while leaving the original panel intact, and controlled panel lighting can make getting in and out at night easier without shining in your eyes. At Blazin' Biddles Off-Road, that is the kind of platform-specific problem we build around.
Build the System Around How You Use the Truck
A show truck that cruises on clear summer nights needs something different than a K20 that sees muddy back roads or a Suburban that pulls family duty after dark. Start with reliable power and grounds, good headlights, correct aim, clean glass, and mirrors that work. Then add lighting where your actual use calls for it.
The best visibility upgrade is not the one that looks brightest in a photo. It is the one that lets you see the road clearly, makes your truck easy for others to see, and still feels right every time you climb into that Squarebody.
Need The Parts For This Build?
We carry everything mentioned in this guide — picked and backed by real Squarebody owners.
0 Comments
Leave a Comment