
How to Upgrade Squarebody Door Audio Right
A Squarebody can have a clean paint job, good seat, and a strong-running small-block, then ruin the whole drive with one blown door speaker buzzing against a forty-year-old panel. If you want to upgrade Squarebody door audio, the goal is not just louder music. It is clear sound, solid mounting, clean wiring, and an install that does not butcher parts you may wish you had left alone.
These trucks were never designed around modern speaker depth, power handling, or door acoustics. That does not mean they cannot sound good. It just means the install has to respect the truck. A speaker stuffed into a thin panel with loose screws and old wiring will disappoint no matter what name is on the grille.
Start With the Door, Not the Speaker
Before ordering speakers, pull the panel and see what you are working with. Squarebody doors have lived hard lives. Look for loose window hardware, worn clips, torn vapor barriers, rust around the lower door, and wiring that has been added and abandoned over the years. Fix those problems first. A door that rattles and leaks will fight every audio upgrade you put in it.
The big decision is where the speaker will live. A lot of old trucks have had speakers cut into the lower door panel, the kick panel, or whatever flat spot a previous owner could reach with a hole saw. It works, but it is hard to undo. Clean original door panels are not getting easier to replace, and a rough cut can make a nice interior look cheap in a hurry.
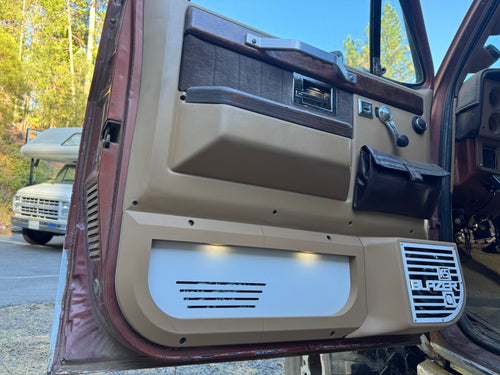
A purpose-built lower door speaker panel is often the better route for an owner who wants real speaker placement without cutting factory panels. It gives the speaker a defined home, keeps the install looking intentional, and can be removed later without leaving a hacked-up door behind. That matters on a survivor truck, a clean restoration, or any build where you want options down the road.
Speaker-panel fitment is not something to guess at. Conventional-cab pickups, K5 Blazers, GMC Jimmys, and Suburbans have differences worth checking, especially with original versus replacement door panels and prior interior modifications. Confirm the application before buying, and do not assume a so-called universal panel will sit right because the truck is roughly the same generation.
Upgrade Squarebody Door Audio With a Real Plan
A good door-audio setup starts with deciding how you use the truck. A weekend cruiser that runs a basic radio needs a different plan than a trail rig with a loud exhaust and big tires. A daily driver may benefit most from clean midrange and better road-noise control. A show truck may put more weight on wiring layout, panel finish, and lighting.
For most builds, a quality 6.5-inch speaker is a practical size. There are plenty of good options, replacement parts are easy to find, and it can produce useful midbass without demanding a giant enclosure. But do not shop by diameter alone. Pay attention to mounting depth, the speaker's mounting hole requirement, and how far the grille will stick out once the door is closed. Window tracks, glass travel, door handles, and panel clearance all get a vote.
Coaxial speakers are the straightforward choice when you want a simple, clean install. The tweeter is built into the speaker, so there are fewer parts to mount and fewer wires to run. Component speakers can give you more flexibility by separating the woofer and tweeter, but they take more planning. If you do not have a clean place to mount the tweeter and crossover, a component set can turn into a lot of work for very little gain.
Do not expect door speakers to do subwoofer work. They can provide strong vocals, guitars, snare, and some punch in the midbass range when mounted well. Deep bass requires air space and power, which is why a properly designed subwoofer system is a separate part of the build. Trying to force low bass through door speakers usually leads to distortion, heat, and damaged cones.
Match the Speaker to the Power You Have
A modern head unit can run efficient door speakers at normal listening levels, especially in a cab where you are not trying to compete with open headers. Still, head-unit power has limits. When the volume goes up, a small internal amplifier runs out of clean power quickly. That is where distortion starts, and distortion is tougher on speakers than most owners realize.
A small external amplifier can make a bigger difference than jumping from one decent speaker to another. The power is cleaner, the speakers have better control, and you are not forced to crank the radio just to hear it over the truck. It does add wiring, fuse protection, mounting work, and tuning time, so it is not mandatory for every build. For a basic cruise-around truck, a good speaker install and a capable head unit may be plenty.
If you add an amp, run proper power wire from the battery with a fuse located close to the battery. Ground the amplifier to clean, bare metal with a short, solid connection. Do not use a random rusty screw, and do not assume the factory radio ground is enough for an amplified system. Poor grounds cause noise, intermittent operation, and wasted troubleshooting time.
Wiring Is Where Clean Installs Win
Old speaker wire is one of those things that can look fine until you touch it. Insulation gets brittle. Connectors corrode. Previous owners twist wires together, wrap them in electrical tape, and bury them behind a panel. Replace questionable wiring while the door is open. It is cheaper than reopening the truck later to chase a dead channel.
Run new speaker wire through a protected path between the cab and door. The wire needs enough slack for the door to open fully, but not so much that it can pinch, rub, or hang up in the hinge area. A proper rubber boot and grommets protect the wire from sharp sheet metal. This is not glamorous work, but it is the difference between an install that lasts and one that fails after a season of opening the door.
Keep signal wiring away from main power wiring where practical. If you are running an amplifier and get alternator whine, start with grounds and routing before buying noise filters. Most noise problems come from a bad ground, a poor connection, or wires laid together where they should not be.
Use solid connections. Crimp connectors done with the right tool work well; solder can work well too if it is supported and insulated correctly. What does not work is a loose twist hidden under tape. Secure the wire inside the door so it cannot slap against the metal shell or window mechanism.
Treat the Door Like Part of the Speaker System
A Squarebody door is a big piece of sheet metal with plenty of places to rattle. Sound deadener will not turn it into a luxury-car door, but it can make a noticeable difference when used in the right places. A few well-placed pieces on the outer door skin and inner structure can reduce panel resonance. Foam between the speaker panel and door can help prevent buzzes and seal small gaps.
The vapor barrier deserves attention too. It keeps water that gets past the window seals from soaking the back of the door panel and entering the cab. Repair or replace it when you are inside the door. Make sure the bottom drain holes are clear. Water sitting in the lower door is bad for the metal, the panel, the wiring, and the speaker.
Do not cover access holes you may need for window hardware without thinking ahead. Do not block drains. And do not pack the entire door full of material just because more seems better. Target the spots that ring, rattle, or let the speaker panel vibrate.
Build the Panel Around the Truck
A lower door panel should look like it belongs on a Squarebody, not like an afterthought from a stereo aisle. The panel needs to mount securely, hold the speaker flat, clear the door hardware, and allow the door to operate normally. Finish matters too. Color-matched panels and controlled lighting can tie an interior together, but the basics still come first: fit, speaker support, and no rattles.
BBOR builds its lighted lower door speaker panels around that exact problem - adding 6.5-inch speaker capability without hacking up the factory door panel. They are built to order in different levels depending on how far you want to take the audio, wiring, lighting, and sound treatment. As with any interior part, verify current fitment details for your truck before ordering.
Tune It Before You Judge It
Once everything is installed, set it up with the truck running and the doors closed. Start with the radio EQ close to flat. Set amplifier gain correctly instead of using it like a volume knob. Bring up the volume until the system plays cleanly, then back it off if you hear strain.
Use a high-pass filter on door speakers if your radio or amplifier has one. That keeps the lowest bass out of the doors and lets the speakers play cleaner at higher volume. The right cutoff depends on the speakers, power, and whether you have a subwoofer, so there is no one magic number for every truck.
Then drive it. A system that sounds good parked in the driveway may reveal a door rattle at 45 mph or a wire that taps inside the panel on a rough road. Fix those small issues while they are fresh. The best Squarebody audio upgrade is the one you can turn up on a long drive without hearing the truck shake itself apart.
Shop the Part
A purpose-built lower door speaker panel is the no-cut way to get that upgrade done right: Customizable Front Door Speaker Panels — '73–'91 Squarebody Chevy & GMC
Need The Parts For This Build?
We carry everything mentioned in this guide — picked and backed by real Squarebody owners.
0 Comments
Leave a Comment